ZWO ASI462MC review by Rutger Bus
At the end of October, beginning of November I got the opportunity to try out and test ZWO’s newest planetary camera through my favorite telescope shop Ganymedes, of which I made the ZWO ASI462MC camera review. As so often in the Netherlands; when you get or buy new stuff, rain and clouds are definitely on the calendar. Of course this also applied to me and it was only in December that I got around to making my first shots with this camera.
Before I dive into the details of the camera, I would like to say that my setup is not exactly the best setup to really test this camera. My current setup consists of a Ritchie Chretien telescope with a focal length of 1370mm and an F-ratio of F9. For planetary and moon photography, an F value of between F20 and F30 is often desired. So I initially needed a barlow of 2.5x to get somewhat close to these F values. After the barlow was finally delivered after a longer period of waiting (a harrowing shortage of barlows due to the favorable Mars opposition at the time), the following problem arose. The back-focus of the camera was so far back with the barlow that I couldn’t get into focus with the above setup. I also didn’t have any extensions and spacers lying around anymore, so in the end, after a lot of attempts to get everything done, I started shooting at F9 without barlow. So, so to speak, not the optimal conditions to put the camera to the test and to reveal the true potential of the camera.
1. Introduction
As a novice astrophotographer, the range of astrocameras can be quite overwhelming. It’s almost like looking for a needle in a haystack. So first ask yourself the following question: what are you planning to take on the photo? If the answer is the moon, planets and the sun, part of the cameras will already fall off. As a rule, you have two types of cameras: cameras for photographing Deep Sky objects such as galaxies and gas nebulae. Or cameras for photographing the moon, sun and planets. With this information you can search much more specifically for the most suitable camera for your purpose.
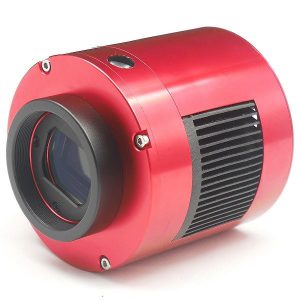
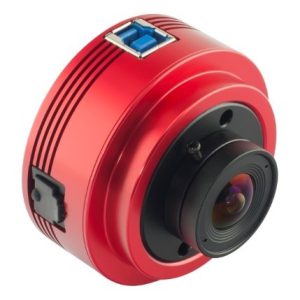
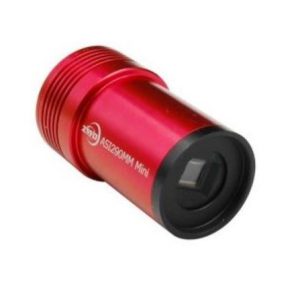
The ASI294MC Pro cool (left) vs ASI462MC (middle) and ASI290MM mini (right). The ASI294MC Pro camera is a real Deep Sky camera where the other two are real planet cameras.
Planet and/or moon photography is a very exciting part of ‘astrophotography‘. It is also a part that you can also start quite easily. Who hasn’t even pointed their DSLR with telephoto lens at the moon to take a picture of it? The biggest advantage of moon and planet photography is that these objects are very bright and can therefore be photographed with a relatively short exposure time. In Deep Sky photography of galaxies and gas nebulae, you usually use much longer exposures because these objects are often very dim. Here you immediately see the biggest difference between the two forms of “astrophotography”. A first thing to keep in mind when making planet images is that the planets are quite small. Even in the best of times, when planets are in opposition and thus closest to Earth, the apparent size of the planets will be about 1/50th the size of our own Moon. But that’s at best, and often the planets will turn out even smaller than that. So you need some form of magnification to make the planets somewhat presentable in the photo. A telescope with a large aperture and sufficient focal point is a must for this. Since I do not meet both criteria with my Richie Chretien, I have fully focused on photographing our own Moon when testing the ASI462MC. In fact, from a theoretical point of view, the word ‘photography’ is not entirely correct here, since you make video recordings with planetary cameras instead of individual photos. These videos are made up of many short recordings of only a few 100ths of a second that can be recorded using specific software, such as sharpcap or firecapture. After that, the acquired videos are processed using specific planetary processing software, such as Autostakkert, or Registax in which only the highest quality frames are selected and used in the final “stack”. The low-quality frames are automatically removed by these programs.
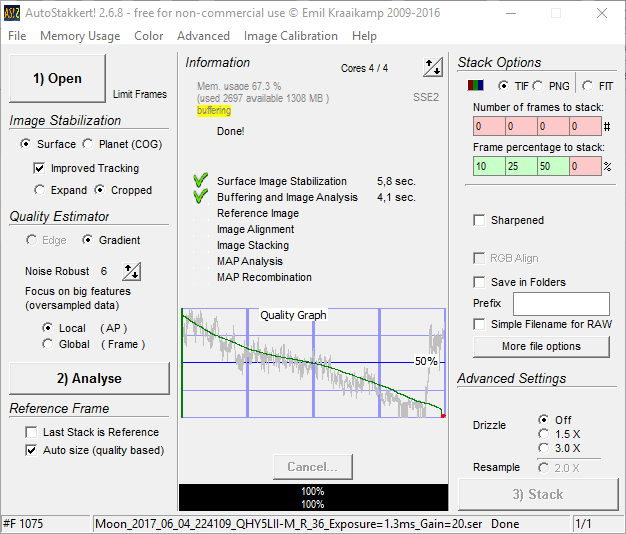
A typical example of the Autostakkert editing program
If you’re looking for one of the best planetary cameras on the market at an affordable price, then look no further. The ASI462MC does exactly what you would expect from a planetary camera.
2. Framerate per second(FPS)
With a theoretical read speed of 139 FPS, the ASI462MC is really an incredibly fast camera. Partly due to the use of the USB3.0 port, you can achieve extremely high readout speeds. Of course, this speed depends on the brightness of your object, but for moon photography, for example, you should be able to achieve this speed. The more frames per second a camera can record, the better this is for the final recording. Take, for example, a camera that can capture 16 images per second. If you make a video of 2 minutes at this recording speed, then you have made 16x60x2=1920 photos in those two minutes. Suppose you stack only 50% of the recordings, then you end up using only 960 recordings in the final stack. If you compare this number of shots to a camera that can capture 120 images per second, you arrive at 120x60x2/2=7200 frames used in the stack. An essentially big difference that you will definitely see in the quality of the photo if you compare the shots side by side.
3. Resolution (megapixels)
With a resolution of 2.1Mp and a sensor size of 1936×1096 pixels, you have a relatively large sensor for taking moon and planet images. As explained above, the planets appear as very small objects in the night sky. As a result, you don’t need a high-resolution camera to capture the planets. Often a 1- or 2-megapixel camera will also work fine. Below I have plotted the field of view of the ASI294MC Pro (11.3Mp, sensor: 4144×2822pix) against the ASI462MC using the online program of Astronomy Tools, the so-called FOV calculator, when using both cameras on my Ritchey Chretien 6″ telescope.
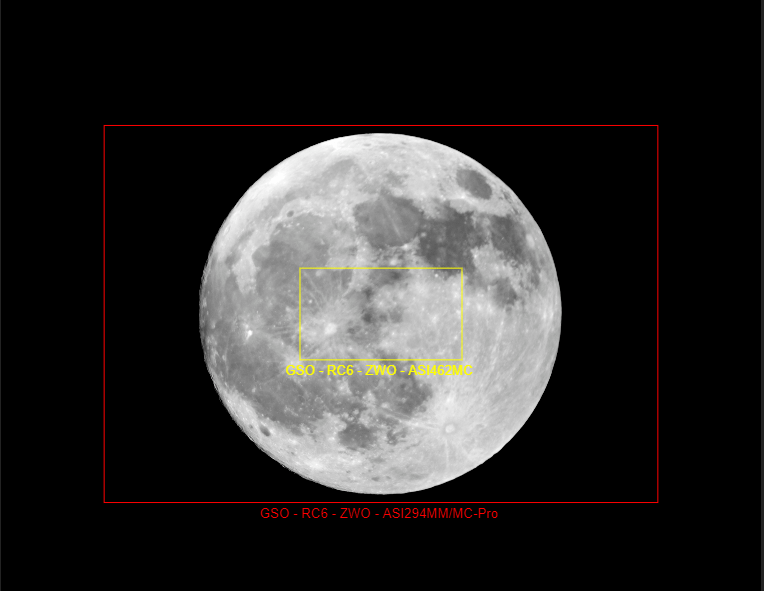
The field of view of the ASI462MC compared to the ASI294MC Pro when used on the RC6”
The difference in field of view is now clearly visible. With the ASI462MC camera you are much closer to your subject and you can visualize finer details on the lunar surface. To get the same image field with the ASI294MC Pro, for example, you would have to crop the recording, which of course also comes at the expense of the number of megapixels. The 2.1Mp of the ASI462MC are therefore more than sufficient to capture beautiful moon and planet details.
4. Quantum efficiency
One of the most important functions of a camera sensor is to register as many photons as possible and actually convert them into a digital signal. This collection of photons and their conversion into a digital signal is what we call “quantum efficiency” (QE). It is this factor that reflects the sensitivity of a camera. For example, if you look at the ASI294MC Pro camera, it has a QE of 75%. This means that 75% of the number of photons that fall on the sensor is actually converted into a digital signal. If we now look at the QE of the ASI462MC, we see a QE of no less than 80%. The sensor of the ASI462MC is therefore better at registering photons. And that’s what it’s all about in astrophotography, collecting as much signal as possible. Some really high-end sensors have a QE of up to 95%, but most amateur astrophotography cameras are in the range of about 50% to 85% QE.
5. Whats in the Box
When you purchase the ASI462MC, you can actually get started with the camera right away. Everything you need is in the box. All you need is a laptop and a telescope to connect the camera to. A child can do the laundry. If you still can’t figure it out, the internet is full of useful tutorials and user videos.
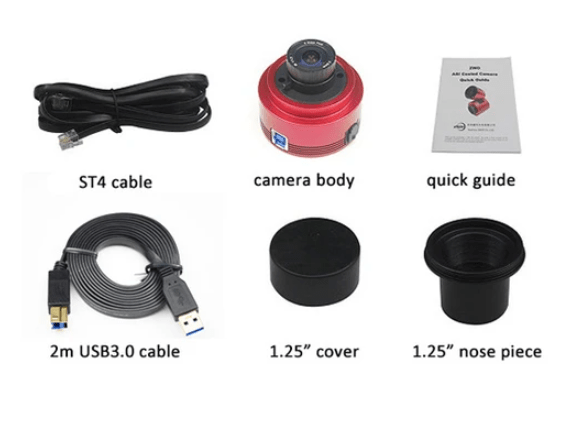
The ASI462MC comes with all kinds of useful accessories including a quick start guide.
6. Results
During the period that I had the camera on loan, the weather did not really cooperate as usual. I was able to use a few clear nights with reasonably good seeing to make some video recordings of 1 to 2 minutes each with the ASIair Pro and the Ritchey Chretien 6” telescope.
Below you can see some of the results achieved, whereby it must be stated again that my setup was not the ideal setup to really test this camera properly. In addition, I am more of a Deep-sky photographer and processing the images into a suitable plate with the software developed for this such as Registax and Autostakkert is more difficult than I had previously thought. Who knows that in the near future I will continue to do planetary moon photography because it remains a fascinating part of astrophotography.
ZWO ASI462MC review by Rutger Bus